Mixing Simplified - Compression 101

En Garde! Now to confront the mysterious beast called compression.
What is it?
Compressors are technically defined as an amplitude; or dynamic processor.
They affect the amplitude of a sine wave; AKA the loudness we perceive. In the simplest of terms, a compressor allows you to control the dynamics of a sound, being the difference between it’s loudest and quietest parts.
In street lingo, think — Automatic volume knob.
A great analogy for a compressor is a boxer and a punching bag. The boxer’s punch is the sound signal and the punching bag is the compressor. Imagine your audio is the punch, and the compressor is the cushion.
Every time a punch hits the bag, you hear a satisfying “thwack”. The bag gives way slightly, as it absorbs the impact and it swings back. With the perfect punch the right kind of punching bag you can really feel the impact of your hits and start to build some rhythm and momentum. This is what good compression should feel like.
If you hit too soft, there won’t be any momentum. If the bag is too heavy, it won’t budge. If the cushion of the bag is too soft, it will absorb all of your punch. If you miss, nothing happens!
Let’s look at the components of a compressor in more detail.
Dials For Days
A compressor usually has 4 basic controls
Ratio — The ratio establishes the amount of change between the input and output levels. Displayed as 2:1, 4:1, 6:1 etc.
This control is a little confusing… If you set the ratio for 2:1 it means that for every 2dB increase of the input signal over the threshold, the output will only increase by 1dB, at 5:1, a 5dB increase in input will increase the output by 1dB.
Here’s an example: Imagine you set a 4:1 ratio. If you set the threshold at -10dB and your input signal comes in at -6dB, it’s 4dB louder than the threshold. So the compressor will kick-in and only output a final level of -9dB, because for every 4db over, the compressor is only allowing a 1 dB increase.
Phew, that’s confusing. Thankfully you never have to think about that again. Just know that lower ratios are more transparent and smooth, good for gentle level control. And higher ratios are more extreme and noticeable, good for intense and aggressive compression.
Onwards!

Threshold — The main control of a compressor is the threshold. It is the level at which the compression ratio takes effect. When the incoming signal reaches or exceeds the set threshold, the compressor will engage and turn it down. The compressor has no effect on a signal below the threshold.
When you turn down the loudest parts of a sound, it allows you to turn up the whole track, which means the quietest parts will be more easily heard.
This is where the fun begins with compression! With the attack and release times, you can drastically affect the shape of the sound or at least the perception of it.
Attack Time — This is the length of time it takes the compressor to start compressing after the threshold had been exceeded. Basically, this is how fast the compressor reacts to the signal. A 50ms attack time means that the compressor will start working 50ms after it hits the threshold.
Let’s not get lost in numbers. To simplify it, think in terms of slow, medium and fast. A fast attack will hit the signal quickly, reducing the transient. A slow attack will allow some (or all) of the transient through, before compressing the signal. This creates the illusion that the transient is actually louder then it was.
For example, if you use a slow attack on drum tracks, it accentuates the transient. Since it’s only clamping down on the tail end of the sound wave. It makes seem louder and hit harder!
That’s some perception-altering magic
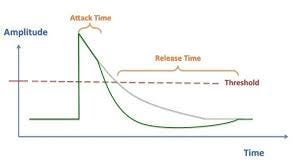
Release Time — This is the time it takes for the compressed signal to return to its original volume. A slow-release will gradually let the signal go, while a fast release results in turning the signal down briefly and instantly lets it go until the next time the threshold is reached. Slow releases are smooth and transparent, while fast releases are abrupt and aggressive.
To sum it up, compression used to automatically control the volume of a track. Compression is best used to limit the dynamic range of sounds and instruments so that the listener can always hear them loud and clear.
However, compression is much more powerful than that. As you become more familiar with the tool and learn some more advanced mixing techniques, you’ll only see level control as a secondary function of a compressor. The most impressive part is how you can shape sound using attack and release times. Compression can really add character to your sounds.
Thinking about our attack and release times, here are a few examples. These are by no means rules, but merely guidelines.
- A fast release time with a low ratio makes a signal seem louder than it is, very transparently
- A short release time with a high ratio will cause the compressor to pump. Typically this is undesirable unless you’re using parallel compression or want that effect.
- A fast attack time with a fast release time will instantly clamp down a signal and immediately release it. This will emphasize the decay and ambiance of the room. Great for drum room tracks.
- Too long of a release time can cause the gain reduction caused by a loud signal to accumulate with the level of a following softer signal. It’s best to set your release time in sync with the timing of the signal to avoid unwanted compression.
- A slow attack time with a fast release time will emphasize the beginning of a transient. Great for drums and vocals.
Limiter — Limiting is basically a compressor with a really high ratio (10:1 and higher). Aside from the level control and sound-shaping capabilities of a compressor, limiting is all about volume. Limiting does what the name implies, it doesn’t let ANYTHING passed the threshold. This is used to stop extreme peaks in a signal and to keep a track at a constant level.
Keeping that in mind, limiters typically aren’t used on track where the transients are crucial. But when you really want to control something and nail it down in volume, it goes a long way. Small amounts are great for bass and vocals.
Makeup Gain — Some compressors have an extra control to adjust the output level independently of the compression. This is useful for when you compress the loud part of a signal but the overall result is too quiet. Simply turn up the makeup gain to bring it to the desired level.
That about covers it for the basics of compression. Hopefully, this helped unveil some of the mystery behind this ultra-powerful tool!
Interested in learning more? Click here to download your Mindset Map and discover your next steps in your musical journey.
My name is Alexandre Joyal. I help music creators achieve success with their music by teaching them how to produce themselves and adopt a creative mindset.

Tired of unfinished tracks?
7 Simple Steps To Take Your Songs From Start To Finish. Download Your FREE Workflow Wizardry PDF
Recent Posts
